Git is a free and open-source distributed version control system, designed for speed and accuracy. While it is powerful, it comes with a learning curve. So starting off, you’re bound to make some mistakes with your commits. That’s okay! The great thing about version control is that you can always roll back to a previous stable state. You can run your experiments in branches without disrupting anything on the master branch. You can pull up the log and decide your next steps and more.
Here I go over 3 powerful Git commands that have eased my development workflow over the Git Command Line Interface (CLI) time and time again.
1. Prevent merge conflicts: a) Pull before you push, b) Work with branches
I use Github here as an example for any online git repository.
a) Pull before you push
Firstly, I do not advise making changes to files within Github directly. But if you do, remember that you’re creating a separate commit in your remote’s master branch that will be ahead of your local repo’s commit. If you’re collaborating on a project with others, this step is a must.
Before you run a git push command from your Git CLI, run a git pull command to make your HEAD point to the latest version of the remote repo. Now run the git push command, to avoid merge conflicts with the remote repository’s branch*.
Quick tip: On projects where I’m clear about my remote repository branch. I set the remote repo as my default upstream branch using the -u flag with my first push. Example:
git push -u origin masterThis way, I only run git push and git pull after that without having to specify the remote and local repo and branches each time.
b) Work with branches
This is the best way to avoid messing up your master branch. When you’re developing a new feature, create a new branch (say named newfeature) and develop within that branch by checking out to it:
git branch newfeature
git checkout newfeature
You can view all your branches using git branch.
Create and edit files in this branch, and merge back with master branch by
git checkout master
git merge newfeature
This merges the newfeature branch with the current branch, i.e. master (which we checked out to in previous step). At this stage or at any point when you feel like ditching the branch, you can delete the branch using -d flag
git branch -d newfeatureOn the first step of starting a branch and checking out to it, you can do both the steps in a single command using
git checkout -b coolnewfeatureThis creates a new branch called coolnewfeature and checks out to it.
2. Changes to my Commits: a) Amend, b) Undo
a) Amend Commit
You made a commit. Then you made minor edits in a file that you intended to add in the previous commit itself. You do not need to create a new commit for this. You can just stage the changes using git add and add to the previous commit using the --amend flag with git commit.
Say I made a spelling change within my README.md and want to include in my previous commit. I can do this by
git add README.md
git commit --amend
and editing (optional) and saving the git commit message. This is especially helpful when you make a minor correction or change that was to be included in the previous commit.
b) Undo Commit
But what if I want to undo my last commit altogether and make a fresh new commit after making further changes in my repo?
Use git reset with the --soft flag to move the HEAD pointer back by one commit
git reset --soft HEAD^1Reset command when used with soft moves the HEAD. The ^ here tells git to move HEAD back by one commit.
This stackoverflow answer explains reset --soft vs commit --amend in more detail.
3. Decorated Graph to see a clean Git Log
This is a neat, clean feature where you can see the log of all your commits and the movement of the branches in your development workflow. Here is what a simple git log command provides for a flask application that I was building:
git log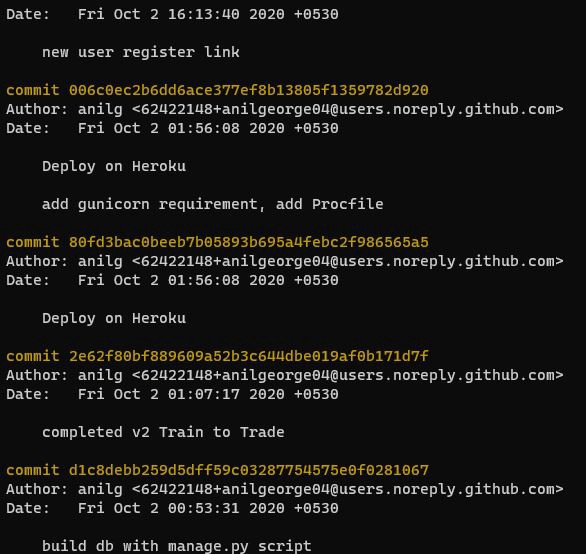
I don’t want to see the author and date and entire commit hash details each time, especially for an app that only I’m working on. A single line with commit message is all I need. When I was deploying this Trading application, I created a local branch to use Heroku. Later merged this with my master branch. I can see this history and single line for commits using the following flags along with git log.
git log --oneline --graph --decorate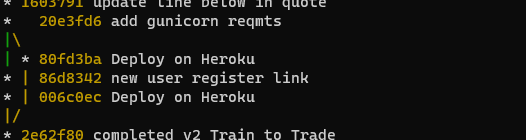
onelinegives me each commit in a single linegraphanddecorateplots the trajectory of the versions and branches using operators and colors
This is neat and crisp, and tells me what I need to know about my commits and when I branched out and merged back with the master branch.
Enjoy using these in your Git workflow.
- To read more about Git commands, Git has excellent documentation here
- To understand the theory behind Git, MIT Missing Semester has an excellent lecture by Anish here.
P.S: Master branch is now referred to as Main branch.